The following information is an iRIS V12.01 quick guide that outlines the changes within the system. It explains the general functionality available in iRIS. The instructions contained here may not contain complete instructions for every aspect of the process and should be used in conjunction with standard operation procedures (SOP) and other iRIS work instructions.
Table of Contents
1.0. Checking-Out and Checking-In Documents
2.0. Drag and Drop Functionality
3.0. Edit Document Within the Browser
4.0. Submission History
5.0. Legacy Study Documents and Approvals
6.0. Ability to Compare Last Approved Version
7.0. Highlighted Stipulation Content on a Form
8.0. Addition of Document Verification Screen When Adding Another Document
9.0. Addition of Study Personnel “Pool” Groups
10.0. Additional Section Available for Non-Study Personnel in KSP Section
11.0. New Signoff and Submission Routing Windows
12.0. New Window Added to Indicate the Start of Submission Form
13.0. Ability to have Multiple iRIS Windows / Sessions Open
1.0 Checking-Out and Checking-In Documents
Documents can now be checked-out with increased efficiency by allowing the user to directly download the file the user originally uploaded without opening an additional page or screen. The system now displays an upload confirmation message on the current page or screen.
Users can check-out a document by clicking the Check-out Document button andclicking Confirm in the popup confirmation dialog. The page is refreshed, with updated check-out details for the document.
2.0 Drag and Drop Functionality
Users can now drag and drop documents in designated upload areas. This new feature is available in most areas of the system where documents can be uploaded.
3.0 Edit document Within the Browser
A new function has been added that allows users to edit uploaded documents (from rich text editors only, i.e. Microsoft Word) within the browser. After the document has been uploaded the option to Add in browser changes to Edit in browser.
When the user clicks the Edit in browser button the rich text editor loads in a separate page. When edits are complete the user clicks Save Document, in the upper right corner of the text editor, to save changes.
4.0 Submission History
New submission history that provides additional information on the history of the submission.
5.0 Legacy Study Documents and Approvals
Legacy and study approval documents can now be easily accessed through the approved, void, and archived files within the study.
6.0 Ability to Compare Last Approved Version
Two new functions and columns have been added to the Submission Components tab in the Submission Processing Queue: Compare to Last Approved and View in Separate Window.
The Compare to Last Approved column gives the user the ability to compare approved forms and documents against the latest version.
When the user clicks the icon in the Compare to Last Approved column a new window opens to present a side by side comparison of both documents. Changes are denoted in different colors: additions in green and deletions in red.
Back on the Submission Components tab in the Submission Processing Queue, the user can click the icon in the new View in Separate Window column toopen the associated submission component in a new window without closing the main page.
7.0 Highlighted Stipulation Content on a Form
Stipulations linked to a form now display in the section of the correction form where the stipulation was set.
8.0 Addition of Document Verification Screen When Adding Another Document
A new validation has been added when uploading a document into a study from the submission form. The user is prompted to confirm that they would like to add an additional document of the selected category and are not trying to revise an existing document that was previously attached.
The system determines if there are existing, previously uploaded documents of the selected category and if any are found, provides buttons allowing the user to either upload a new document or revise an existing document.
If the user chooses a different type of document than the one that is already attached a confirmation message is added to the popup, prompting the user to select “I want to add new Document that has not been uploaded for this Study” as verification.
9.0 Addition of Study Personnel "Pool" Groups
Users are now able to group Study Personnel into different Pools to create study teams. This feature enables users to pull a Study Personnel Pool with KSP already assigned. Pools are a convenient feature to use when the same team of people will often be on studies together.
In this example, John Investigator and Jane Doe are in the Pool named “General Pool”.
On the Create My Personnel Pool tab, the user can create a Personnel Pool to add KSP assigned to the study. All users already assigned to “Selected Study Personnel” for the study are also automatically added to the Pool.
10.0 Additional Section Available for Non-Study Personnel in KSP Section
A new property has been created for adding non-study personnel to a study.
The Setup Study Personnel page is loaded, opened to the User Search tab.
When the user selects Non-Study Personnel the dropdown role list unlocks, allowing the user to assign a role to the selected person.
11.0 New Signoff and Submission Routing Windows
A more user-friendly way to submit and route signoffs for submissions has been created, enabling users to confirm the KSP and additional personnel on the same page.
After the submission form is created the user has the option to Signoff and Submit or to Notify PI to Signoff, depending on the role of the user submitting the application.
Clicking on either of these buttons opens a Setup for Submission Routing and Signoff popup window where the user can select the personnel who need to sign off on the submission.
In the popup window, KSP data values from Section 3.0 of the Study Application are shown in the first section. Users can select the different KSP for submission routing and signoff.
12.0 New Window Added to Indicate the Start of Submission Form
A new informative message has been added between the steps of completing the study application and the submission form. When the study application is complete a new message is presented to alert the user that they are now moving on to the submission form.
13.0 Ability to have Multiple iRIS Windows/Sessions Open
It is now possible for users to have multiple iRIS™ windows / sessions open in the same browser window simultaneously.
Toggle Item
PI and Research Personnel System Instruction
The following information is an iRIS V12.01 system guide that explains the general features available in iRIS for those on the PI/Study team side. These features and functionality are the same across the IRB, IBC, and IACUC. The information contained here may not contain complete instructions for every aspect of the process and should be used in conjunction with standard operation procedures (SOP) and iRIS work instructions.
Table of Contents
1.0. Creating a New Study
2.0. Accessing a Study Submission That is Not Completed
3.0. Accessing a Study
4.0. Study Dashboard
5.0. Submission Forms
6.0. Modifying the Study Application
7.0. Comparing Document Versions
8.0. Compare Last Approved Version
9.0. Responding to Stipulations
10.0. Accessing Study Approvals
11.0. Tracking Approvals
12.0. Addition of Study Personnel “Pool” Group
13.0. Additional Section Available for Non-Study Personnel in KSP Section
14.0. How to Add an External Research in iRIS
1.0. Creating a New Study
To create a new study, click on the Create a New Study tab.
Here you will select the applicable application (IBC, IRB, IACUC). Once the application is selected click on Start selected/Application.
Complete all the sections within the application and select Save and Continue to Next Section after completing each section.
Once you are completed with the application you will navigate to a page that allows you to upload supporting study documentation.
You can add a new document to the study, by clicking the Add a New Document button.
A new page will open within the browser. Here you will specify the name of the document, in the Document Title field.
Version Number - Requires you to specify what number you wish this version of the document, to be on. This can be any character or number. After the editable version number is a hard coded .0. This is the iRIS version number for the document. Any new document you upload to the system will begin with the .0 affixed to your manually entered version number. Anytime a revision is made to the document through the system, iRIS will change the .0 to .1 and will continue to increment the numbers each time a revision is made. This is how the system tracks the number of revisions to the document in iRIS. You will always be able to revise your manually entered version number, but you are unable to revise the iRIS version number
Version Date – This is the date of the manually entered version number. This is typically the date the document was uploaded to the system. You can choose whether or not to have this field auto filled for you are using the system.auto_fill_version_date property, located under Study Document Screen Setup.
Category – This configurable drop-down list allows you to select a category for the document. This question may or may not be required, based on the system.doc_category_required property.
Description – A description of the document.
Comments – Any comments regarding the document you feel necessary, to add for the reviewing board to see
Enter the required information including the document itself then click the dotted box or drag and drop your document into the box to upload the document. Once your document is uploaded click Save Document.
Once saved you will be navigated back to the Study Documents page, and here you can view your uploaded document.
From here you have the ability to detach your document or revise the document.
When you select or Revise Existing you will be navigated to a page that allows you to complete your revisions.
Here you can edit, delete, view, and revise your document.
When you select Create Revision a pop-box will appear.
Here you can Check-out the document you would like to revise. Users can check-out a document by clicking the Check-out Document button andclicking Confirm in the popup confirmation dialog. The page is refreshed, with updated check-out details for the document.
Once the document is revised select on Check-in Document. When the document is uploaded select Save Document.
After the submission form is completed and all supporting documents are uploaded the user has the option to Signoff and Submit or to Notify PI to Signoff, depending on the role of the user submitting the application.
Clicking on either of these buttons opens a Setup for Submission Routing and Signoff popup window where the user can select the personnel who need to sign off on the submission.
In the popup window, KSP data values from Section 3.0 of the Study Application are shown in the first section. Users can select the different KSP for submission routing and signoff.
Once you click Signoff and Submit, you will be routed to the signoff page. Here you can view the form and documents being submitted and create a printable version of the submission.
You will also need to select approve or deny, then Save Signoff. This will route the study to the next step.
2.0. Accessing a Study Submission That is Not Completed
To access a study application that was started and not completed you will navigate to the Forms Pending Submission tab.
When selected a pop-box will appear that shows all submissions that are not completed.
Here you can access a submission by clicking on the icon under the Open Version List column. When selected the submission page will open, and here you will select Edit/View. This will open the started submission, and from here you can continue to complete your request.
3.0. Accessing a Study
To locate your studies, open the View My Studies tab found within Study Assistant workspace.
The page that opens will display the studies you have a role on, along with basic information about each study. Use the filters to narrow the list to the study you need to open. iRIS will default this screen to show the most recently used study at the top of the list. You can use the search criteria at the top of the page to locate the study you are looking for.
Once you have located the study in the list, click the Open icon. This will take you to the study dashboard.
4.0. Study Dashboard
When you open a study by using the View My Studies feature, the page will open to the Submissions tab.
This tab contains links to various forms that can be created, completed, and submitted throughout the lifetime of the study.
The top of the page lists a header with study specific details. The left portion of the page contains links to the Study Application, Informed Consent, Other Study Documents and any form you may need to create and submit for review.
The right side of the page contains a link to Submission History, which will list out all forms submitted for review on the study.
Also listed is a link to Study Correspondence and an area for Outstanding Submissions.
Within the Protocol Items tab, you can view the study application, informed consent, and other study documents. Here you can view all study legacy information for the study. Each folder is broken up into subfolders of Approved, Void, and Archive.
Here you can open documents, view, and edit, and compare document versions.
Within the document page you also have the ability to conduct a search by inputting the applicable filter information.
Field
Description
Show Hidden
The default selection for this filter is set to “No”. This means that all the documents viewed on the page are only the non-hidden documents. When you select “Yes”, the page will refresh and will display all documents for the study.
Select Category
This provides the ability to choose a Consent Category in the search. The default selection is set to “All” meaning all consents in all categories will display in the results.
Title
Type in all or part of a document title to include in the filter.
Version #
Type in a version number to include in the filter.
Approval Date
You can specify a date range for approval dates. You must enter a date into both fields. If you want just one day, put the same day in both date fields.
Consent (document) Outcome
You can select a review board document outcome in this drop-down list.
Expiration Date
You can specify a date range for expiration dates. You must enter a date into both fields. If you want just one day, put the same day in both date fields.
From the study dashboard you also have the ability to view the Submission History and Study Correspondence.
When clicking on Submission History, you are able to view all of the legacy information for the study. Each line item includes a hyperlink that will take you to a specific submission.
This page is broken up into Submissions in Process, Completed Submissions, and Submissions Returned with Changes.
When you click on Study Correspondence you can view all iRIS generated correspondence.
If you click the View Message icon the correspondence and any attachments will appear.
5.0. Submission Forms
You can submit documents to two ways, through the forms section within the IRB studies queue or through the study dashboard.
The list of forms here will change depending on the forms setup in your system (IRB, IACUC, IBC). You can create and submit a form any time by clicking on the link for the form.
When you click on a form link from the main Submissions page you will be directed to a screen that lists any previously started or completed forms for the study. The header of the page contains buttons that allows you to Copy Forms, Add a New Form, Compare Two Versions or Delete Selected Form(s), (provided it has not been submitted for review).
The table below the buttons lists any form already started.
The Checkbox column is used to copy, compare and delete a form. Click the checkbox next to the form(s) to delete, then click the Delete Selected Form(s) button.
Show Rev – If a form has been revised for corrections a folder will appear in this column. You can click on it to see the previous versions of the form. You will be able to open the previous submission, but it will be read only as that version has been submitted previously. You can also compare the differences between two versions of the same form by clicking the checkboxes and then click the Compare Two Versions button.
Edit/View – Click on this icon to continue to work on a form you have already started but have not completed yet, or to view a form that has been submitted previously.
Details – Click over hover over this icon to show the Submission Summary.
When the user fills out the data value “Submission Summary”, it will act as a summary for the submission, but also as an identifier that will show up under “Details”.
Apply to Multiple – An icon will appear when a form has been created. This allows you to add the form to another study.
By clicking on the icon, it will take you to anther screen where the user will be able to attach a copy of the form to the another study.
From this page you have the ability to Copy a Form, Add a New Form, Compare Two Versions, and Delete Selected Form(s).
When you select Add a New Form, the new form should appear. Complete each of the application sections within the form and click Save and Continue to Next Section, once each section is completed.
Once the form is completed you will need to Signoff and Submit.
Once you click Signoff and Submit, you will be routed to the signoff page. Here you can view the form and documents being submitted and create a printable version of the submission. You will also need to select approve or deny, then Save Signoff. This will route the study to the next step.
6.0. Modifying the Study Application
When submitting a modification request, you may need to revise the study application. To do this click on the Click here to attach the application button within the modification form.
A popup box will appear, select on the Add Revision icon.
A popup will appear asking you to confirm that you would like to create a revision, select confirm.
Go through the application and make the applicable updates. Once your changes are made, you will return to the modification form.
The revised application will be listed in the Application Attachment data value. If you need to detach the application, click the icon in the Unattach column. This will not delete this version of the application; it will simply remove the version from the form.
7.0. Comparing Document Versions
When there is more than one version of a document a yellow folder icon will appear in the table. When you click on the yellow folder, any previous versions will display below the most current version.
This will allow you to view information related to older versions. You can even view the previous versions’ unapproved document by clicking on the Word icon in the File column.
You can also compare versions of the document by clicking the checkbox, next to two versions of the same document and then clicking on the Compare document versions button at the top of the page.
Once Compare document versions is selected a popup box will appear that shows the changes within the documents.
8.0. Compare Last Approved Version
To compare a new version of a document to a previously approved version, click on the icon under the Compare to Last Approved column.
When the user clicks the icon in the Compare to Last Approved column a new window opens to present a side-by-side comparison of both documents. Changes are denoted in different colors: additions in green and deletions in red.
9.0. Responding to Stipulations
When a submission is returned for corrections, the Principal Investigator and any Study Contacts listed on the study will receive a notification from iRIS alerting of the request. They will also receive a task on the homepage called Submission Correction, or if a review board has met on your submission and returned it for corrections based on the review, the task will be called Review Response.
Within the Study Assistant workspace, all outstanding tasks are located within the Tasks table.
Select View All Tasks to view any outstanding tasks. Here you will find outstanding tasks.
Click on the icon under the Click to Open column. Once clicked the review response form should appear. Click Save and Continue to Next Section.
Within the next page you will see all outstanding stipulations that need to be addressed.
Here you can view the stipulation by clicking on the hyperlink under the Component Name column.
Once selected the stipulation will be linked to a specific section within the document.
Navigate back to the stipulation page and select on Revise Existing.
A popup will appear confirming that you would like to create a revision, click on confirm.
Go through the form and make the applicable corrections and click on Exit Form once completed.
Once completed you will be navigated back to the stipulation page. Here you can select on Compare Form Version to view the changes you made to the form.
A popup will appear that shows the changes between the versions.
When the stipulations have been addressed add a comment for the analyst within the comment box and select Complete Action.
When completed click on Save and Continue to Next Section within the upper righthand corner of the page, and apply your signoff.
10.0. Accessing Study Approvals
When the review board approves your submission an Outcome Letter will be generated and sent to within iRIS. If you have been listed as a recipient of the outcome letter a PDF copy will be emailed to you. A copy will also be accessible in the Correspondence button on your homepage.
The letter will be accessible to any study personnel with access to the Study Correspondence link, within the Submissions tab.
Click on View my Studies to obtain the approvals for the study. Navigate to the applicable study and click on History and navigate to the Completed Submission tab. Click on the icon within the View Outcome Letters tab.
Click on the icon under the View Letter column.
The approval letter will generate within a popup window when the icon is clicked.
To access study document approvals, navigate to the study dashboard.
Under Protocol Items navigate to the applicable approval by selecting Informed Consents or Other Study Documents. Within the document page, select the Approved tab. When selected all the approved documents for the study should appear.
When you click on the PDF icon, the approval will appear in a popup window.
11.0. Tracking Approvals
You can track study approvals by clicking on Track Approvals within the Study Assistant Workspace.
When selected you will navigate to the Studies Submission Status- In Progress queue.
Within the right-hand side select on the Steps icon under the Actions column to view the history of a study submission that is in progress.
Any steps that are still in process will be displayed and highlighted in a particular color.
The date the process was received is displayed in the Date Created column. If details of a step can be viewed (i.e. View Signoff, View Details), an icon will be displayed under the View Details column. Select the icon to view the event details.
In this example we can view who signed off on the submission.
Within the history tab you can view data as to how long the submission was in a specific phase of the process. You can also select on the different task status to view additional information.
12.0. Addition of Study Personnel "Pool" Group
Users are now able to group Study Personnel into different Pools to create study teams. This feature enables users to pull a Study Personnel Pool with KSP already assigned. Pools are a convenient feature to use when the same team of people will often be on studies together.
In this example, John Investigator and Jane Doe are in the Pool named “General Pool”.
On the Create My Personnel Pool tab, the user can create a Personnel Pool to add KSP assigned to the study. All users already assigned to “Selected Study Personnel” for the study are also automatically added to the Pool.
13.0. Additional Section Available for Non-Study Personnel in KSP Section
You can add Non-study personnel to a study when setting up the KSP for the study.
The Setup Study Personnel page is loaded, opened to the User Search tab.
When the user selects Non-Study Personnel the dropdown role list unlocks, allowing the user to assign a role to the selected person.
14.0. How to Add an External Research in iRIS
Non-BYU researchers must follow these steps to be added to a BYU IRB application and access iRIS:
You will have a limited view (below) when you first log in. Logging in the system will create your BYU iRIS account.
Email irb@byu.edu or call 801-422-3606, the IRB office, to assign account access. Please share the following information:
Your full name and NetID
Specify that you are an external researcher to BYU
Complete and shareCITI Training records with BYU
Login to your current CITI account, https://www.citiprogram.org/. Click on the option below to “Add Affiliation.” Select Brigham Young University-Provo, UT from the drop down list. (This allows BYU to see your CITI Training Records.)
Note: BYU Standard Operating Procedures require that all researchers have training through CITI Program, including each of the modules in the Social & Behavioral Research Investigators/Mentors course. You may need to complete some training modules to fulfill this requirement.
Email irb@byu.edu or call 801-422-3606, the IRB office, to ensure we have received your CITI training records and to associate them with your BYU iRIS account.
After you complete steps 1-3 above, the PI can add your name to the study protocol, and you will be able to access iRIS. By completing all these steps, you help the IRB process the application more smoothly and expeditiously.
Toggle Item
How to Complete an iRIS Profile
Login to your iRIS account. Use your single sign-on credentials. Click on MY PROFILE in the upper right corner of the homepage.
Click on MY ACCOUNT.
Complete the menu items located on the left side of the profile.
Toggle Item
How to Make a Copy of an iRIS Application
Login to your iRIS account. Click on STUDY WORKSPACE.
SCROLL DOWN TO THE BOTTOM OF THE HOME PAGE to IRB STUDIES. Click on the ALL tab.
Search for the desired study row. On that row you will see several options under the ACTIONS column—select the COPY icon.
When you click the COPY icon you will now see a "COPY OF [followed by the original title of the study]” listed.
Click on the PAD AND PENCIL ICON to the left and a template of the original application will open. Be sure to rename the study in Section 1, both the full study and the abbreviated study title.
If you were working on stipulations on the previous application and did not address the stipulations, be sure to address the stipulations in the new form and provide complete, updated responses to reduce the review period and time of approval.
Review all of the documents (consent, recruiting script, instruments, site approvals, and scientific review) to ensure all the information is correct and applicable to the current study proposal.
Please also ensure all study personnel have current CITI certification before submission.
Toggle Item
How to Upload Your CV on iRIS
Login into iRIS. Click on MY PROFILE in the upper-right corner. Go to MY ACCOUNT.
Click on BIOSKETCH, CV, PUBS. Click on ADD CV OR BIOSKETCH.
Make sure that CV is selected. Enter a title and version date (today’s date). Click on the UPLOAD button.
Click on CHOOSE FILE. Navigate to your desired file and select it. Click on SAVE SELECTED FILE.
Once the file has uploaded you will see it displayed below.Make sure to click on SAVE UPLOADED FILE TO IRIS otherwise the file will drop off the system.
Once the file has been successfully saved, the following message will appear and you will see the CV shown below. If the process has been completed correctly the CV will only have to be uploaded once.
Toggle Item
How to Add an External Researcher in iRIS
The following instructions explain how to add a researcher from another institution into the iRIS system. Non-BYU researchers must follow these steps to be added to a BYU IRB application and access iRIS.
You will have a limited view (below) when you first log in. Logging in the system will create your BYU iRIS account.
Email irb@byu.edu or call 801-422-3606, the IRB Office, to assign account access. Please share the following information:
Your full name and NetID
Please indicate that you are an external researcher to BYU.
Complete and shareCITI Training records with BYU
Login to your current CITI account, https://www.citiprogram.org/. Click Add Affiliation. Select Brigham Young University-Provo, UT from the drop-down list. This allows BYU to see your CITI Training Records.
Note: BYU Standard Operating Procedures require that all researchers have training through CITI Program, including each of the modules in the Social & Behavioral Research Investigators/Mentors course. You may need to complete some training modules to fulfill this requirement.
Email irb@byu.edu or call the IRB Office at 801-422-3606 to ensure we have received your CITI training records and to associate them with your BYU iRIS account.
After you complete steps 1-3 above, the PI can add your name to the study protocol, and you will be able to access iRIS. By completing ALL these steps, you help the IRB process the application more smoothly and expeditiously.
Toggle Item
How to Add a Revised Consent Form
Create a BYU NetID
First, go to https://accounts.byu.edu/new to create a NetID. You can also go to BYU.edu > MyBYU > “Don’t have an account?”
Second, go to https://myaccount.byu.edu to add your email address. Use the same email address as you used for your CITI Program login.
You will have a limited view (below) when you first log in. Logging in the system will create your BYU iRIS account.
Email irb@byu.edu or call 801-422-3606, the IRB Office, to assign account access. Please share the following information:
Your full name and NetID,
Please indicate that you are an external researcher to BYU.
Complete and shareCITI Training records with BYU
Login to your current CITI account, https://www.citiprogram.org/. Click Add Affiliation. Select Brigham Young University-Provo, UT from the drop-down list. This allows BYU to see your CITI Training Records.
Note: BYU Standard Operating Procedures require that all researchers have training through CITI Program, including each of the modules in the Social & Behavioral Research Investigators/Mentors course. You may need to complete some training modules to fulfill this requirement.
Email irb@byu.edu or call the IRB Office at 801-422-3606 to ensure we have received your CITI training records and to associate them with your BYU iRIS account.
After you complete steps 1-3 above, the PI can add your name to the study protocol, and you will be able to access iRIS. By completing ALL these steps, you help the IRB process the application more smoothly and expeditiously.
Toggle Item
Scientific Review System Process
1.0 Scientific Review
There is now the capability to route a study for scientific review within iRIS.
When you setup the key personnel for the study, this is where you will identify and assign a scientific reviewer to the study.
When you select Setup Study Personnel the setup study personnel screen will appear. Search for the individual that you would like to assign as the scientific reviewer by entering in the applicable information and by selecting Find/User Search Directory.
When the individual appears click on Select, this will take you to the Add Personnel Role screen. Here you will assign the individual as the Scientific Reviewer. Once completed click save, this will route the study for Scientific Review, once the study application is completed and has been signed off within iRIS.
To verify that a Scientific Reviewer has been assigned, navigate to section 3.4 of the study application.
When the submission is routed for final signoff, this is where you will also very that a Scientific Reviewer has been assigned.
2.0 Completing a Scientific Review
A new capability within iRIS allows us to now complete Scientific Reviews within the system. When a study has been assigned to an individual for Scientific Review, they should receive an automatic email notification from iRIS.
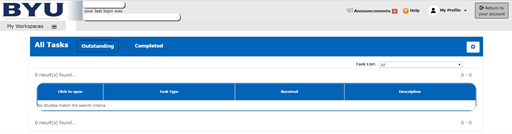
Within iRIS under All Tasks – Outstanding, this is where you will find studies that have been assigned to you that require Scientific Review. Click on the notepad icon to open the submission and complete the review.
Here you can view the applicable documentation associated with study by selecting the icon within the View in Separate Window column. You can also click on the hyperlink associated with a document and that will automatically open the document within iRIS.
You will need to complete the corresponding reviewer checklist, see below. One you have completed the checklist, select either Approve or Deny, and Save Signoff. This will complete the review and remove the item from your task list.
Toggle Item
How to Access and Complete a Continuing Review
All studies categorized as full board as well as some expedited studies are required to be renewed each year by completing the continuing review process. The following instructions will show you how to access the continuing review form in iRIS.
Login to your iRIS account. Click on STUDY WORKSPACE.
SCROLL DOWN TO THE BOTTOM OF THE HOME PAGE to IRB STUDIES. Click on the ALL tab.
Search for the desired study row. On that row you will see several options under the ACTIONS column—select the FORMS icon.
When you click the FORMS icon you will now see a menu of forms pertaining to the study. Choose IRB CONTINUING REVIEW SUBMISSION FORM and click on START A NEW SUBMISSION.
The Continuing Review form will open. Section 1.2 will draw in information from the original application. You will then fill out the form. In Section 1.3, please be sure to click on CLICK HERE TO ATTACH THE APPLICATION. A window will pop up to show the latest approved version of the application. Select that option or click on ADD REVISION under CREATE A REVISED APPLICATION to update any changes you want to make for the next approval period.
In Section 1.4 you will be asked if your study is ACTIVE or INACTIVE. If for any reason you have paused the study, you will choose INACTIVE and will be asked to close the study. You can later make a copy of the application as a template to update the information and restart the IRB review and approval process.Click SAVE AND CONTINUE to progress to the next section.
Sections 2.3 and 2.4 are very similar. Section 2.3 is asking how many subjects were enrolled in the last year. Section 2.4 is asking for the TOTAL number of subjects enrolled during the lifecycle of the study. If this is your first continuing review, then both numbers will be the same.
Click SAVE AND CONTINUE in the upper right corner to progress through the form. There are 10 sections.
Toggle Item
How to Modify a Study
You can only request modifications if your study is active and approved by the IRB. To make changes to your approved study, please follow the instructions below.
Login to your iRIS account. Click STUDY WORKSPACE.
SCROLL DOWN TO THE BOTTOM OF THE HOME PAGE to IRB STUDIES, click on the ALL tab.
Search for the desired study row. On that row you will see several options under the ACTIONS column—select the FORMS icon.
When you click the FORMS icon you will now see a menu of forms pertaining to the study. Choose IRB MODIFICATION REQUEST and click on START A NEW SUBMISSION.
The modification form will open. Section 1.1 will draw in information from the original application. Fill out the form and provide a description of the modification and a justification for the change(s).
Update the application to include ALL of the proposed changes. Attach the application to the modification form by clicking on CLICK HERE TO ATTACH THE APPLICATION.
If the proposed changes include revisions to the instruments, consent forms and recruiting materials, attach them to Section 1.13.
Toggle Item
How to Close a Study
When you have collected and analyzed all the data, you are ready to close the study. You must complete the IRB Closure Form on iRISbefore the study can be closed. The following instructions provide directions on how to access and submit the IRB Closure Form.
Login to your iRIS account. Click on STUDY WORKSPACE.
SCROLL DOWN TO THE BOTTOM OF THE HOME PAGE to IRB STUDIES. Click on the ALL tab.
Search for the desired study row. On that row you will see several options under the ACTIONS column—select the FORMS icon.
When you click the FORMS icon you will now see a menu of forms pertaining to the study. Choose IRB CLOSURE FORM and click on START A NEW SUBMISSION.
The closure form will open. Section 1.2-1.3 will draw in information from the original application. Respond to the status of the study in Section 1.4. Save and go to the next section.
Answer the questions in Sections 2 through 5 until you advance to the second to the last page. If you are ready to submit the form, click SIGNOFF AND SUBMIT.
You will be taken to a confirmation page. This is a check for the system to make sure you want to close the study. Click APPROVE and SAVE SIGNOFF.
You will then see the WORKFLOW-SUBMISSION TRACKING page. This page confirms that the IRB received your submission and lists the date and time you submitted the action.
**Pro-tip: If you have several submissions and you are unsure from the workflow-submission tracking if the right study was submitted, click on the plus sign to expand the information and the system will show you the study details for verification.